

Roadnavier® Automotive Electronics Masterclass
Acura TL (2009–2014) Android Screen Upgrade Guide
Everything You Need to Know Before Buying: Base Trim vs. Technology Package, ELS Audio Retention, and 12.3" Screen Compatibility.
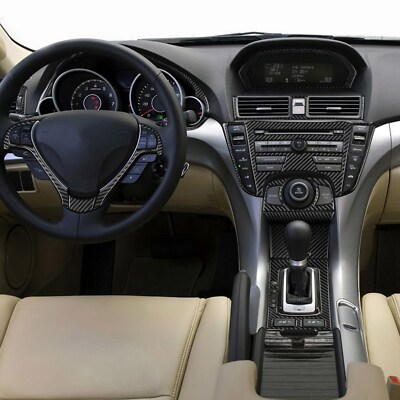
Factory dash layout of the 4th Generation Acura TL (2009–2014).
Introduction
The fourth-generation Acura TL (2009–2014) remains one of Acura's most popular luxury sedans. Many owners appreciate its powerful V6 engine, comfortable interior, and premium ELS sound system, but the factory infotainment system now severely shows its age.
Common complaints include:
- Outdated factory navigation maps and slow routing
- Small monochrome or low-resolution display on Base models
- No native Apple CarPlay or Android Auto support
- Limited Bluetooth audio functionality (HandsFreeLink module failure issues)
- Aging mechanical HDD navigation drive prone to disk failure
- Slow, clunky joystick-driven user interface
A modern Android screen upgrade transforms the driving experience by delivering wireless Apple CarPlay, Android Auto, real-time Google Maps navigation, music streaming, and a high-definition touch display.
1. Identify Your Acura TL Factory System
Before selecting an upgrade unit, confirm your dash configuration. Acura used distinct radio layouts for non-navigation and navigation trims.

Center stack control panel for Acura TL Base Trim (Non-Navi).

Center stack control panel for Acura TL Technology Package (Navi).
Key Identifiers at a Glance:
- Base Trim (Non-Navi): Features a small, recessed monochrome/red text information screen at the top, a physical volume knob centered on the stack, and no large rotating controller wheel beneath the climate controls.
- Technology Package (Navi): Features an 8-inch color display recessed deep in the dash hood, an "ELS Surround" logo on the head unit faceplate, and a large multi-directional Interface Dial (joystick) on the center console.
Next Step: Learn how to identify your Acura TL trim and factory radio before ordering.
👉 Identify Your Acura TL Before Ordering →2. Base Trim vs Technology Package
Understanding the electrical and signal routing differences between trims is crucial for seamless aftermarket integration.
| Feature / Specification | Base Trim (Non-Navi) | Technology Package |
|---|---|---|
| Display Type | Monochrome Dot-Matrix Screen | 8-inch High-Res Color LCD |
| Audio System | 276-Watt 8-Speaker System | 440-Watt ELS Studio 10-Speaker System |
| Amplifier Signal | Standard Analog Speaker-Level/Line-Level | Differential Balanced Analog / CAN Triggered |
| HVAC Display Data | Routed to Top Red Screen | Integrated into Main 8-inch Color Screen |
| Harness Type | Standard 24-Pin Honda Harness | Complex Dual-Plug Navigation Harness |
Still unsure which version you own?
👉 Acura TL Factory Radio Identification Guide →3. Which Models Are Compatible?
Our hardware kits support the full fourth-generation model run, including minor facelift revisions introduced by Acura:
- 2009–2011 Acura TL (Pre-Facelift): Base & Technology Packages (FWD & SH-AWD).
- 2012–2014 Acura TL (Facelift): Base, Technology, & Advance Packages (FWD & SH-AWD).
Note: 2012–2014 models feature updated HDD protocol bus speeds. Ensure you select your specific model year range when ordering so the correct CANbus decoder box is included with your harness bundle.
Compatibility Confirmed?
View 12.3" Acura TL Screen Product Page →4. Why Upgrade to a 12.3-inch Floating Screen?
Traditional double-DIN radios force you to use small 8-inch touchscreens that sit too low in the Acura TL's center stack, taking your eyes off the road. The modern solution is a high-resolution floating display.
Roadnavier® 12.3" Android Screen Upgrade for Acura TL
Engineered specifically for the 2009–2014 Acura TL dashboard topology. Plug-and-play installation preserving OEM climate controls and steering wheel commands.
Shop Acura TL 12.3" ScreenWireless Apple CarPlay & Android Auto
Connect your phone automatically upon starting the car. Access Apple Maps, Google Maps, Spotify, and messaging apps hands-free.
1920x720 IPS HD Display
Ultra-wide viewing angles with anti-glare coating ensure readability even in direct sunlight.
Retain OEM Steering Wheel Controls
Volume, track skip, and voice commands map directly through the included CANbus decoder box.
5. Factory Audio Integration
One of the biggest concerns for Acura TL owners is maintaining the high-fidelity sound output from the factory ELS Surround Sound System.
ENGINEERING INSIGHT: The Acura ELS amplifier requires a clean, low-distortion low-level audio signal. Roadnavier custom wire harnesses utilize high-grade line output converters (LOCs) and shielded RCA interconnects to prevent alternator whine and ground loop noise while preserving deep subwoofer bass response.
6. Installation Overview
Upgrading the radio in a 4th Gen Acura TL is a straightforward DIY project requiring basic hand tools (trim removal tool, socket wrench, and Phillips screwdriver).
- Trim Removal: Unclip the side dash accent trim strips starting from the center console moving upward.
- Unbolt Radio: Remove retaining bolts holding the factory head unit chassis in place.
- Plug & Play Wiring: Disconnect factory plugs and insert the Roadnavier custom T-harness between the car and the new unit.
- Route Antennas: Position the included GPS antenna and 4G antenna behind the upper dash trim.
- Mount & Test: Mount the floating screen bezel, restore battery power, verify CANbus HVAC readouts, and perform initial CarPlay pairing.
Ready for physical installation?
🛠️ Read Step-by-Step DIY Installation Guide →