roadnavier
Range Rover L322 | 2002–2012 | 10.25" Android Screen — Wireless CarPlay & Android Auto
Range Rover L322 | 2002–2012 | 10.25" Android Screen — Wireless CarPlay & Android Auto
Couldn't load pickup availability
Before you buy
Before you buy
Please confirm your vehicle year, original dashboard layout and factory audio system before ordering. If you are unsure, use the online chat button and send clear photos of your original screen and controls.
Read the full compatibility check →
Shipping & Delivery
Shipping & Delivery
Free shipping is available to most U.S. addresses.
A US$70 surcharge may apply to carrier-designated remote or extended-area addresses. We will contact you for approval before dispatch.
[Read full shipping policy →]
Warranty & Returns
Warranty & Returns
One-year limited warranty for confirmed non-human-caused hardware faults.
We provide remote diagnosis first, then replacement parts, repair or replacement where appropriate.
Returns require prior approval. Unused and uninstalled products may be returned within 30 days of delivery. Installed or used products cannot be returned because of a change of mind.
Modernize Your L322 Without Giving Up the Factory Functions You Still Use
Upgrade your original infotainment system with a 10.25" OEM-style Android head unit designed for the Range Rover L322 2002–2012.
Keep the important original vehicle functions while adding wireless Apple CarPlay, Android Auto, modern navigation, Android apps and improved audio control.
Will It Fit My Range Rover L322?
Yes — this system is designed for the Range Rover L322 2002–2012.
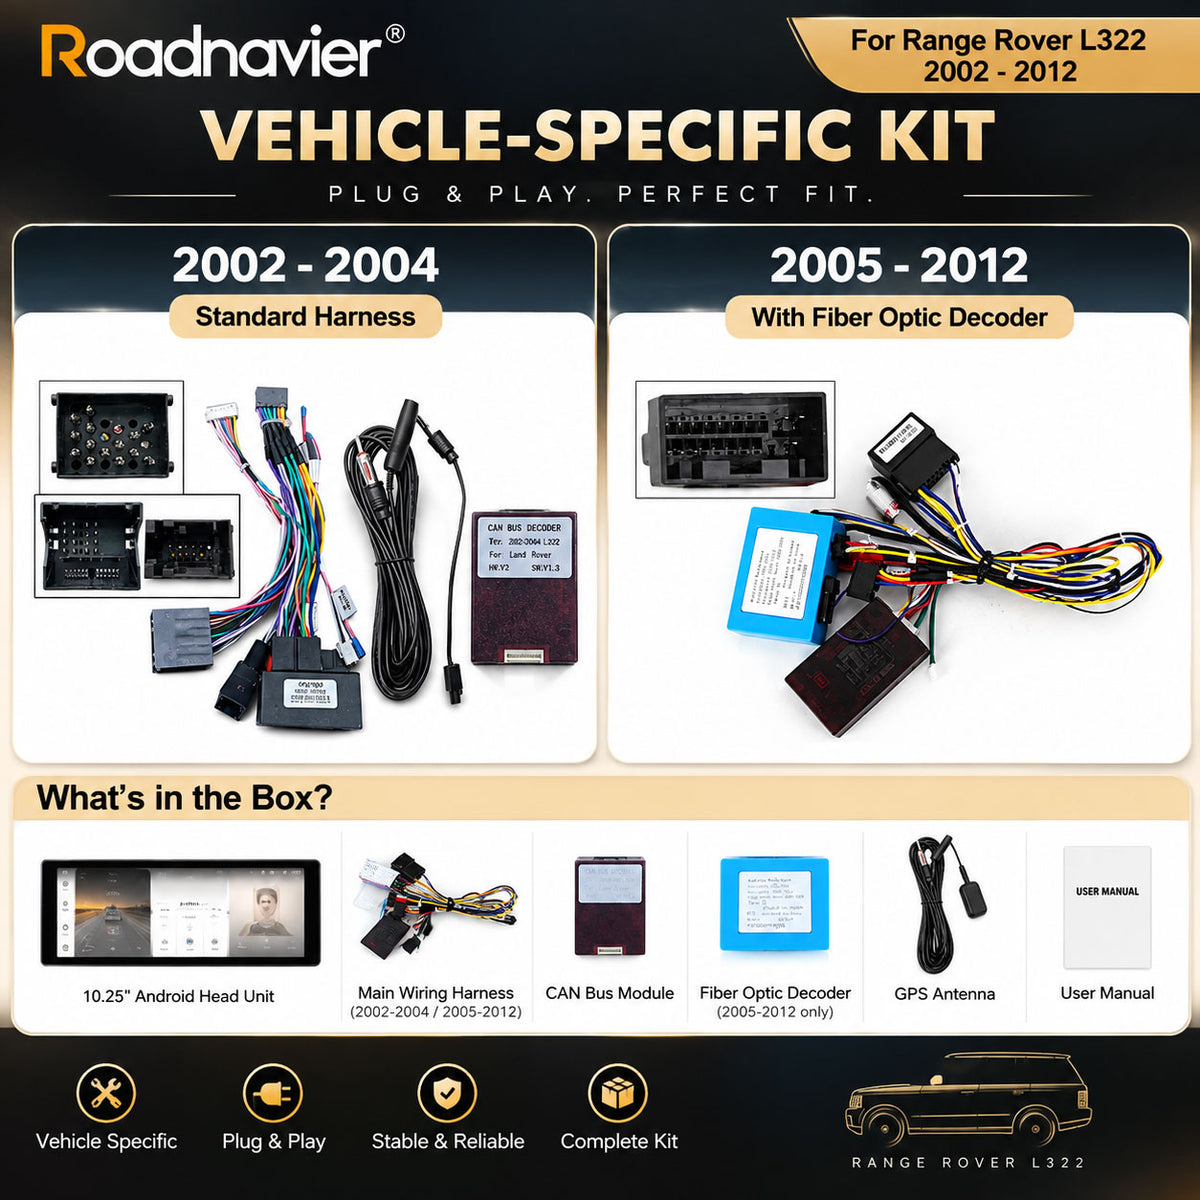
The dashboard and connections differ by model year. Simply select your vehicle year when ordering and we will supply the matching version.
Select the 2002–2004 version when ordering.
Select the 2005–2012 version when ordering.

What Factory Functions Will I Keep?
The upgrade is designed to retain the important original L322 functions you still use.

A Modern Daily Driving Experience
Keep the character of your L322 while bringing the everyday infotainment experience up to date.

Actual current 10.25" L322 unit supplied by Roadnavier with the latest user interface.
What Comes With the System?
This is a vehicle-specific L322 upgrade kit, not just a standalone Android screen.

10.25" Android head unit with vehicle-specific wiring, CANBUS interface and installation accessories.
How Difficult Is the Installation?
This is a complete head-unit replacement. The original head unit is removed and the new system connects through the vehicle-specific wiring supplied for your L322 configuration.
DIY installation is possible if you are comfortable removing automotive trim and working with vehicle-specific connectors. Otherwise, professional installation is recommended.
Check the Hardware
Confirm the main hardware and system features before ordering.
| Vehicle | Range Rover L322 2002–2012 |
|---|---|
| Screen Size | 10.25" |
| Resolution | 1920 × 720 |
| Platform | UIS7865 |
| Android Version | Android 14 |
| Apple CarPlay | Wireless |
| Android Auto | Supported |
| DSP | Built-in DSP |
| Bluetooth | Supported |
| Wi-Fi | Supported |
Questions L322 Owners Ask Before Ordering
Will my factory 360° camera still work?
Yes. If your L322 is originally equipped with the factory 360° camera system, it can be retained with the correct vehicle-specific configuration.
My L322 has Rear Entertainment. Will the rear screens still work?
Rear video can be supported with an optional USB-to-CVBS/RCA video output adapter. The Android head unit does not have native RCA video output, so the adapter is used to send Android video to compatible rear entertainment screens.
If you want us to confirm your factory Rear Entertainment setup before ordering, send us photos of the rear screens and original system.
Do I keep the original factory head unit?
No. This is a full head-unit replacement. The original unit is removed and replaced by the new 10.25" Android head unit.
Can I still adjust the clock and time?
Yes. After installation, the date, time and time zone can be adjusted directly through the Android system settings.

Can I install it myself?
DIY installation is possible if you are comfortable removing automotive trim and working with vehicle-specific wiring. Otherwise, professional installation is recommended.
What if I need help during installation?
Send us clear photos or a short video showing the connection or issue. We can help you check the installation step by step.
Select Your L322 Model Year
For most Range Rover L322 owners, simply select the correct vehicle year when ordering.
If your vehicle has an unusual factory configuration — especially Rear Entertainment or a factory 360° camera — or you are unsure about your original dashboard, send us:
1. Vehicle year
2. One clear photo of the original dashboard
3. Photos of any factory feature you want to retain
We will confirm the correct setup before you order.
Confirm My L322 Setup⌘ Installation Guide ⌄